APIs are an important part of modern software because they enable communication between different systems and make data exchange possible. We need to test APIs to make sure they work correctly. Postman is a tool that can be used for API testing as it allows developers to send requests, review responses and run automated tests.
In this guide, I will explain how API testing in Postman works using JavaScript and provide you with the knowledge needed to create more effective API tests. So, let’s begin!
What is API Testing?
API testing is a type of software testing that focuses on verifying that the API works as expected. API testing looks at the core functionality, sending requests to API endpoints and examining the responses. This helps verify key aspects such as functionality, performance, security, and reliability.
Why is API Testing Important?
You can make sure that your APIs work correctly and meet performance and security expectations by testing them. You can catch issues early and prevent bugs from affecting the entire application by validating each API endpoint.
Key reasons API testing is important:
- Functionality: Confirms that each endpoint returns the correct responses.
- Performance: Tests the API’s ability to handle various loads and respond quickly.
- Security: Ensures that sensitive and important data is protected and that the API is not vulnerable to attacks.
- Reliability: Validates that the API performs consistently across different scenarios.
- Integration: Ensures smooth communication between different components or systems.
Types of API Testing
Different types of API testing target specific aspects of an API’s performance and reliability:
- Unit Testing: Unit testing tests individual endpoints and the logic behind them.
// Example of a unit test for an API endpoint pm.test("Status code is 200", function () { pm.response.to.have.status(200); }); - Integration Testing: Ensures that different components interact correctly.
// Example of an integration test pm.test("User API integrates correctly with Auth API", function () { var jsonData = pm.response.json(); pm.expect(jsonData.authenticated).to.be.true; }); - End-to-End Testing: Simulates real-world scenarios by testing the complete process from start to finish and ensures that all parts of the application work together seamlessly.
// Example of an end-to-end test pm.test("Complete user workflow", function () { pm.sendRequest( { url: "https://api.example.com/users", method: "POST", body: { mode: "raw", raw: JSON.stringify({ name: "John Doe" }), }, }, function (err, res) { pm.expect(res).to.have.status(201); }, ); }); - Performance Testing: Performance testing identifies bottlenecks and ensures that the API can handle the expected load.
// Example of a performance test pm.test("Response time is less than 200ms", function () { pm.expect(pm.response.responseTime).to.be.below(200); }); - Load Testing: API Load testing tests how the API handles a large number of requests.
- Contract Testing: API Contract testing ensures the API follows agreed-upon specifications.
// Example of a contract test
pm.test("Response adheres to contract", function () {
  var jsonData = pm.response.json();
  pm.expect(jsonData).to.have.property("id");
  pm.expect(jsonData).to.have.property("name");
});
What is Postman?
Postman is a tool for developing and testing APIs. Its features simplify the process and make it more efficient for various team members involved in software development.
Here are the key features of Postman:
- User-Friendly Interface: Create and manage API requests easily with a visual interface.
- Collections: Group related API requests into collections to keep things organized.
- Environment Variables: Use variables for different environments like development, staging, and production to streamline testing.
- Automation with Newman: Run Postman collections from the command line, which is useful for integrating with CI/CD pipelines.
- Mock Servers: Create mock responses to simulate APIs for testing purposes.
- Monitoring: Schedule and run API tests regularly, get alerts on failures, and ensure API performance.
- Documentation: Generate and share API documentation directly from your Postman collections.
Why Use Postman for API Testing?
Postman is widely used for API testing because it offers a range of features that streamline the process:
- Ease of Use: The user interface is intuitive, making it easy to set up and manage API requests without much effort.
- Comprehensive Features: Postman allows for both manual and automated testing, along with performance and security checks.
- Collaboration: Postman allows teams to share collections, environments, and test results, fostering better collaboration.
- Environment Management: Easily manage different environments (e.g., development, staging, production) with environment variables.
- Mock Servers: Create mock servers to simulate API responses and test your applications without needing the actual backend.
- Continuous Integration: Integrate Postman tests into your CI/CD pipelines using Newman, ensuring your APIs are continuously tested.
How to Use Postman to Test APIs
Testing APIs with Postman is straightforward, thanks to its user-friendly interface and robust features. Here’s a step-by-step guide on how to get started:
Step 1: Sign Up for a Postman Account
First, download and install Postman if you haven’t already. You can sign up for a free account, which allows you to save your requests and collections in the cloud.
Step 2: Create a New Request
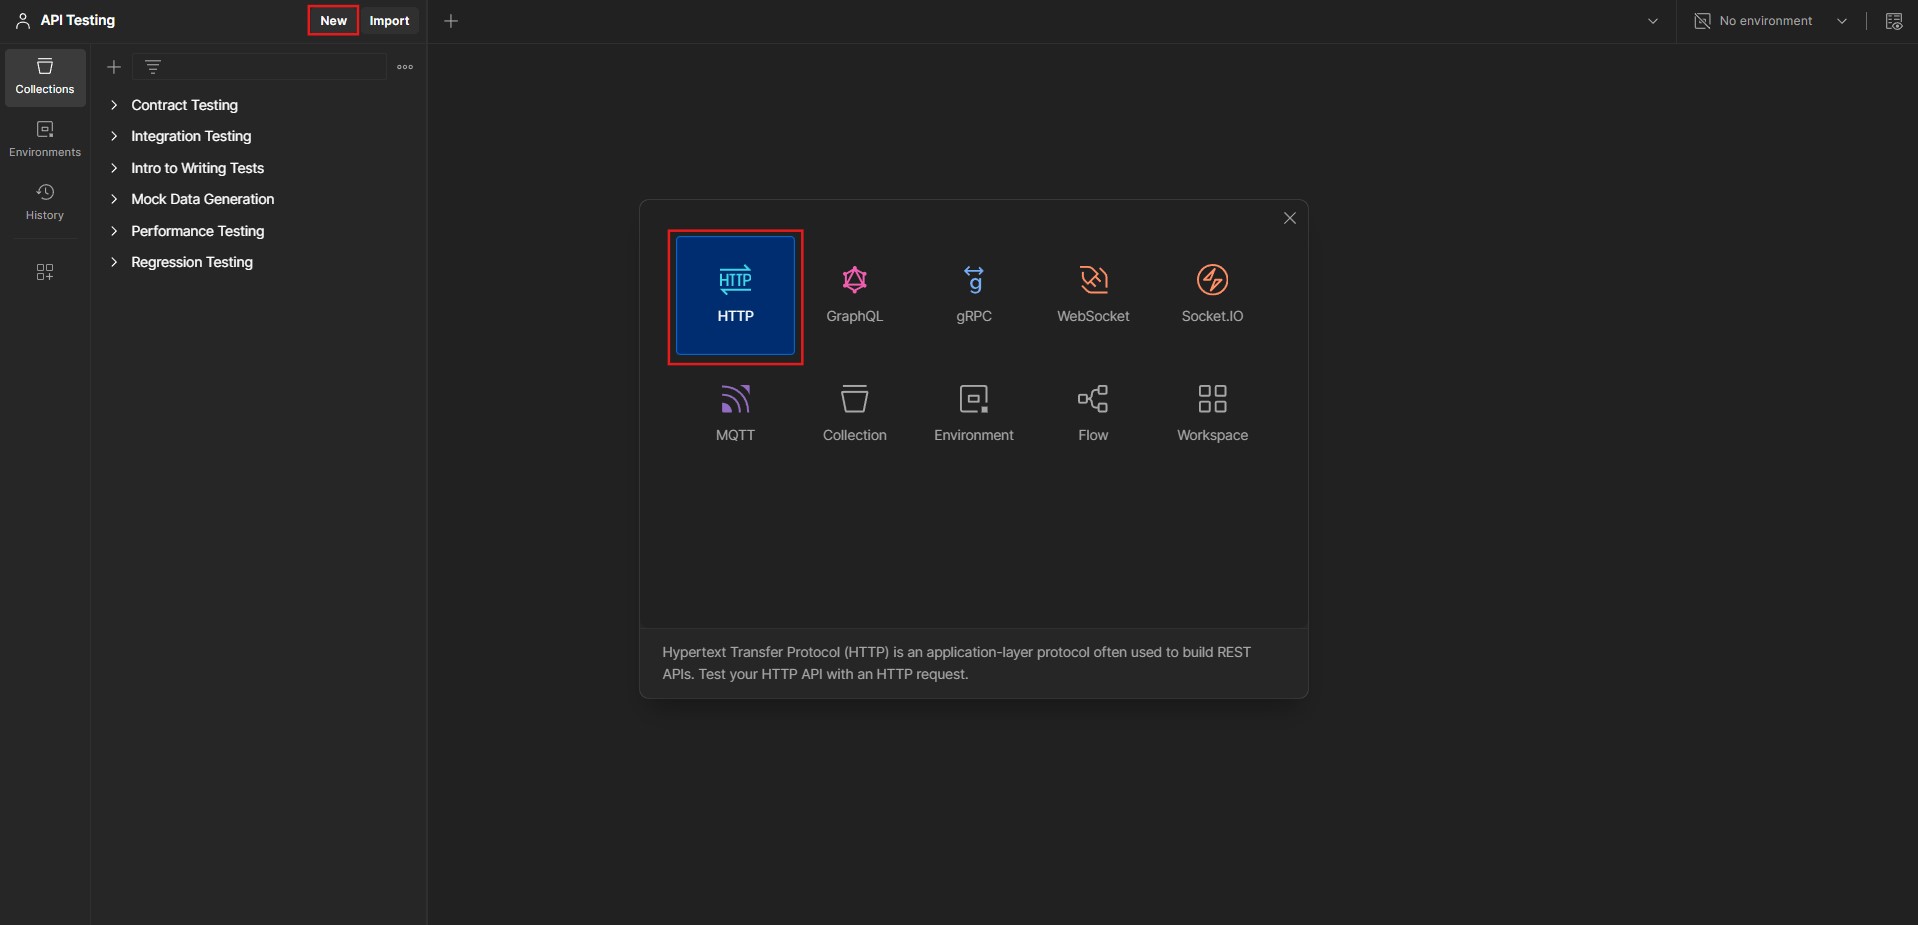
- Open Postman and click the “New” button.
- Select your request protocol to create a new API request (We will use HTTP for this guide).
- Name your request and choose a collection to save it in.
Step 3: Enter Request Methods and Parameters
- Choose the HTTP method (GET, POST, PUT, DELETE, etc.) from the dropdown.
- Enter the URL for your API endpoint.
- If needed, add parameters, headers, and body data. You can do this in the respective tabs under the URL field.

Step 4: Send the Request
- Click the “Send” button to send your API request.
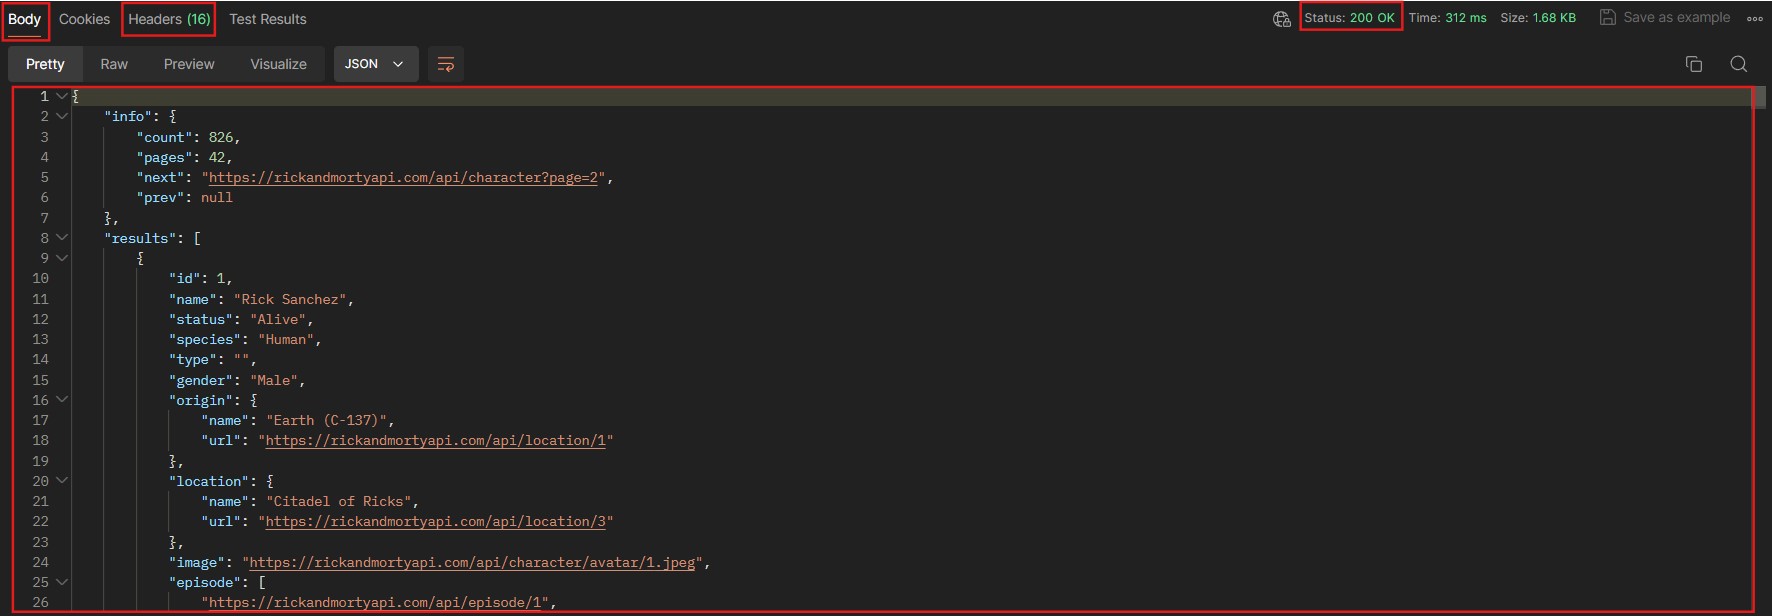
- Postman will display the response, including the status code, headers, and body.
Step 5: Analyze the Response
- Check the status code to ensure the API request was successful (e.g., 200 OK).
- Review the response body to verify the returned data.
- Check the headers for additional information about the response.
Step 6: Create a Postman Collection
- Collections allow you to group related API requests.
- To create a new collection, click the “New” button and select “Collection.”
- Name your collection and add a description if needed.
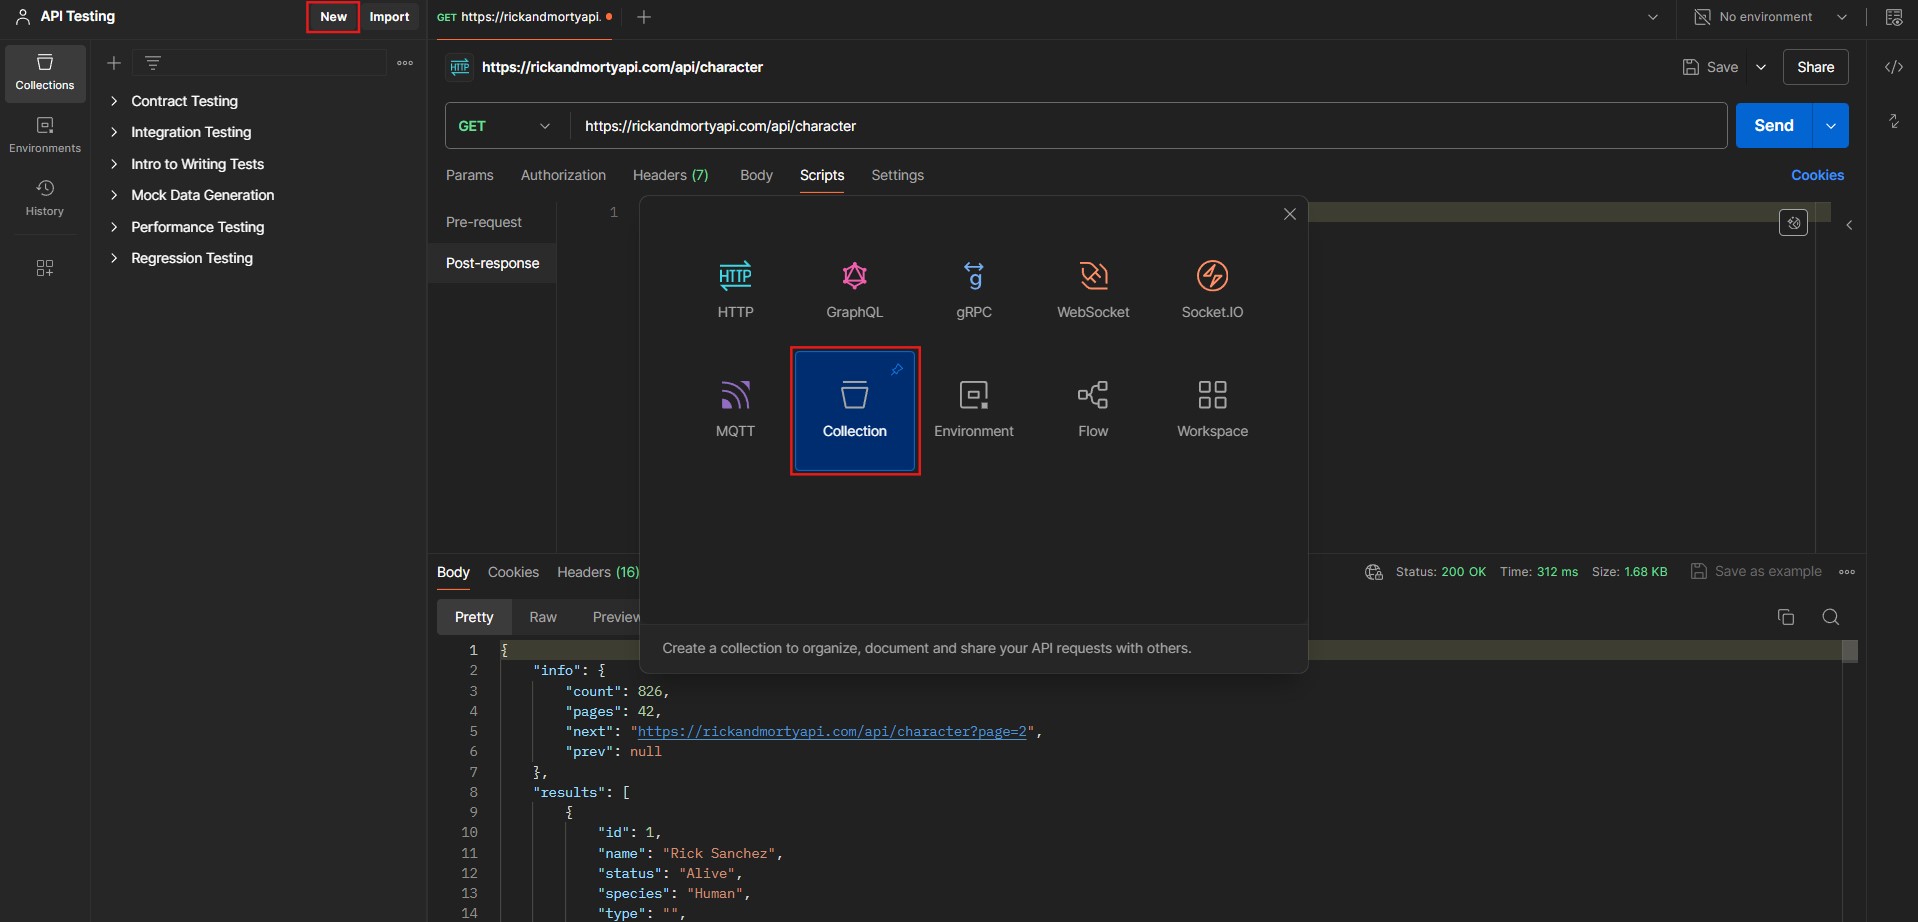
Step 7: Add Requests to the Collection
- Save your individual requests into the appropriate collection.
- This helps keep your tests organized and easy to manage.
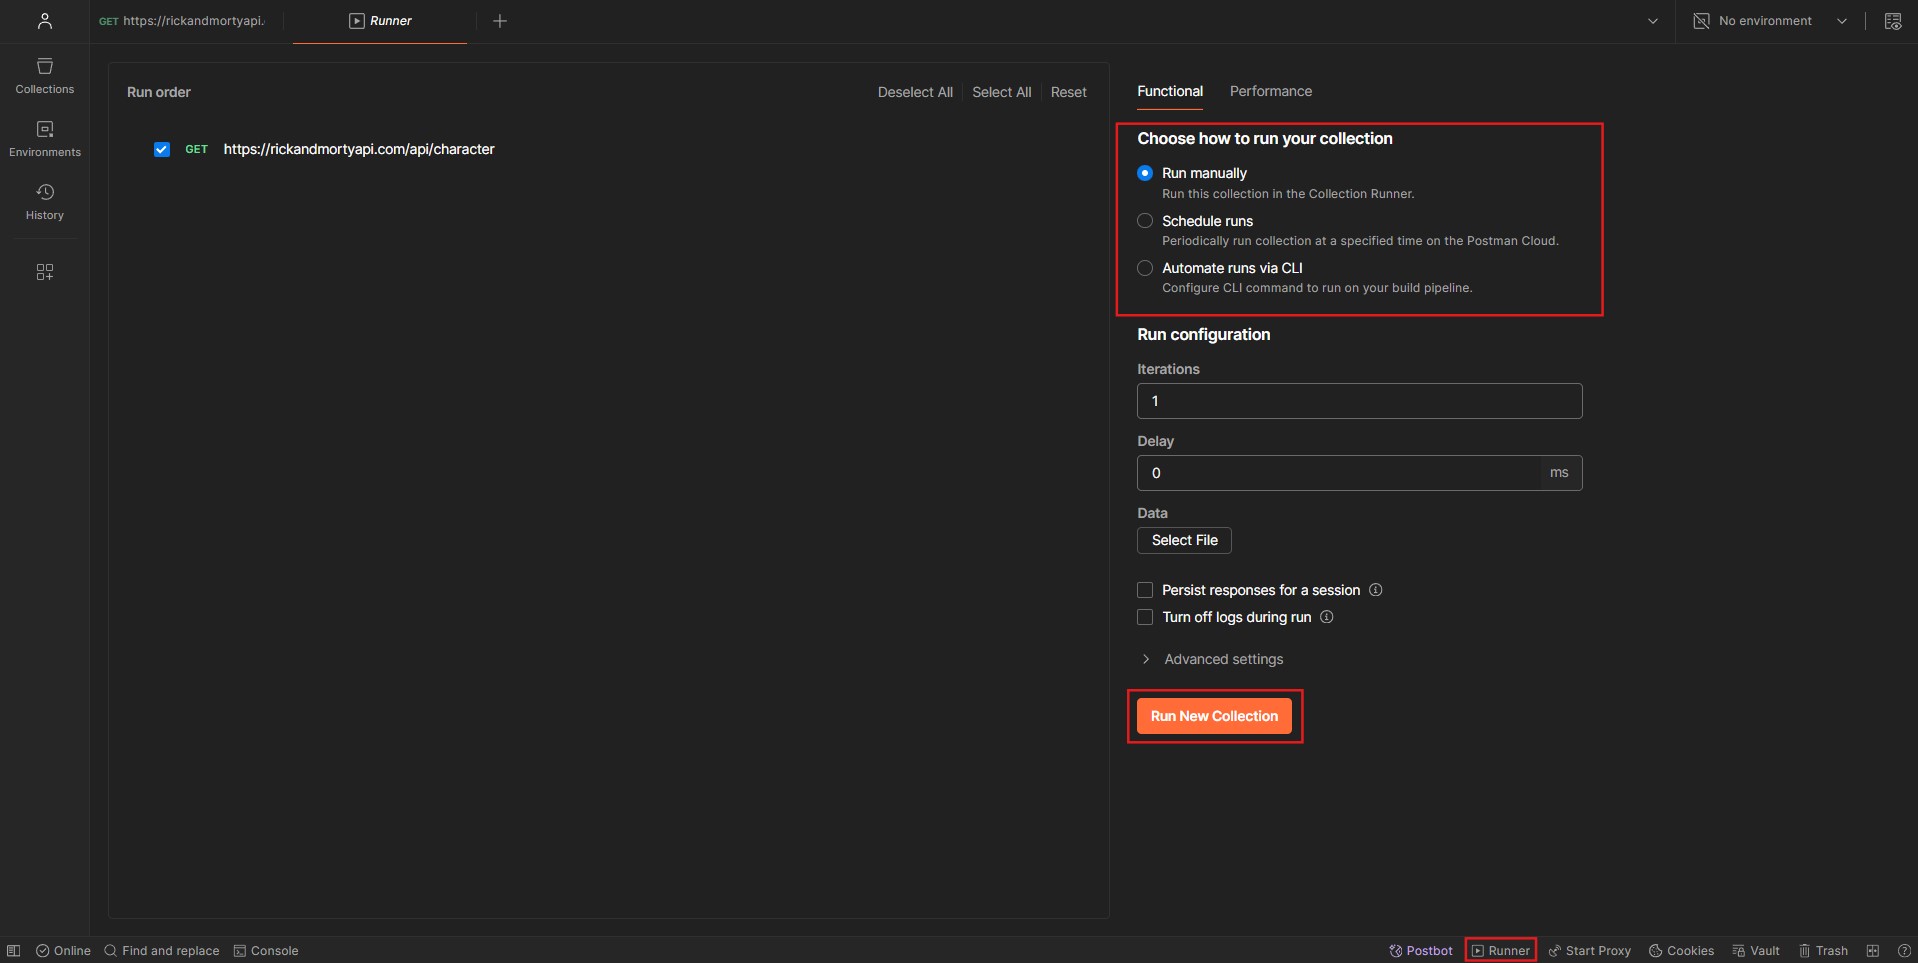
Step 8: Use the Postman Collection Runner
- The Collection Runner allows you to run all the requests in a collection sequentially.
- Open the Collection Runner by clicking on the “Runner” button in the bottom-right corner.
- Drag and drop the collection you want to run from the sidebar and configure any necessary settings (e.g., environment, iterations).
- Choose how to run your collection (e.g., manually, scheduled or automated via CLI)
- Click “Run” to execute the requests. Postman will display the results for each request in the collection.
Postman Automation: How to Do It?
Automating your API tests with Postman can save time and ensure consistency in your testing process.
Here’s a step-by-step guide on how to set up automated tests in Postman:
- Select the “Scripts” Tab: In your request, go to the “Scripts” tab under “Post-response” and write JavaScript tests.
- Run as a Collection: Save requests into a collection, then use the Collection Runner to execute them. Configure settings like environment and iteration count.
- Integrate with CI/CD: Use Postman CLI to run collections from the command line. This allows you to integrate your tests into CI/CD pipelines.
- Monitor Test Results: Set up Postman monitors to schedule tests and receive alerts on failures.
Using Postman in CI/CD Pipelines
Integrating Postman into your CI/CD pipeline helps automate API testing during development and deployment. Here’s how you can do it:
- Set Up Collections: Organize your API tests into collections within Postman.
- Automate in CI/CD: Install Postman CLI and run collections via the command line:
- Install Postman CLI: First, download and install the Postman CLI.
- Authenticate: Use the provided command to log in with your API key:
postman login --with-api-key <your-api-key>- Run the Collection: Use the following command to run your collection:
postman collection run <your-collection-id> - Integrate with CI/CD Tools: Add Postman CLI commands to your CI/CD pipeline (e.g., Jenkins, GitLab, CircleCI) to run tests automatically.
- Monitor Results: Review test results after each run to catch any issues early in the pipeline.
Postman Monitors and Their Benefits
Postman Monitors allow you to schedule and automate your API tests at regular intervals. Here’s how they benefit your workflow:
- Continuous Testing: Monitors run tests automatically at set intervals, ensuring ongoing API functionality.
- Early Issue Detection: Automated monitoring helps catch issues before they affect production.
- Performance Tracking: Monitors help track response times and other performance metrics over time.
- Alerts and Reports: Receive alerts when tests fail and view detailed reports for each run.
Setting Up a Monitor Example
Here’s a quick example of setting up a Postman Monitor:
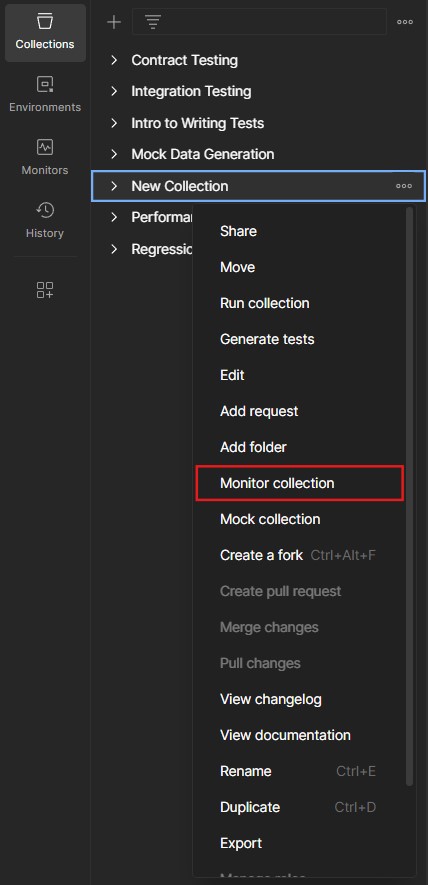
- Create a Monitor:
- Right click on your collection, click on the “Monitor collection”, and select “Create a Monitor.”
- Name your monitor and choose the environment (e.g., development, production).
- Right click on your collection, click on the “Monitor collection”, and select “Create a Monitor.”
- Configure Schedule:
- Set the frequency (e.g., every 30 minutes).
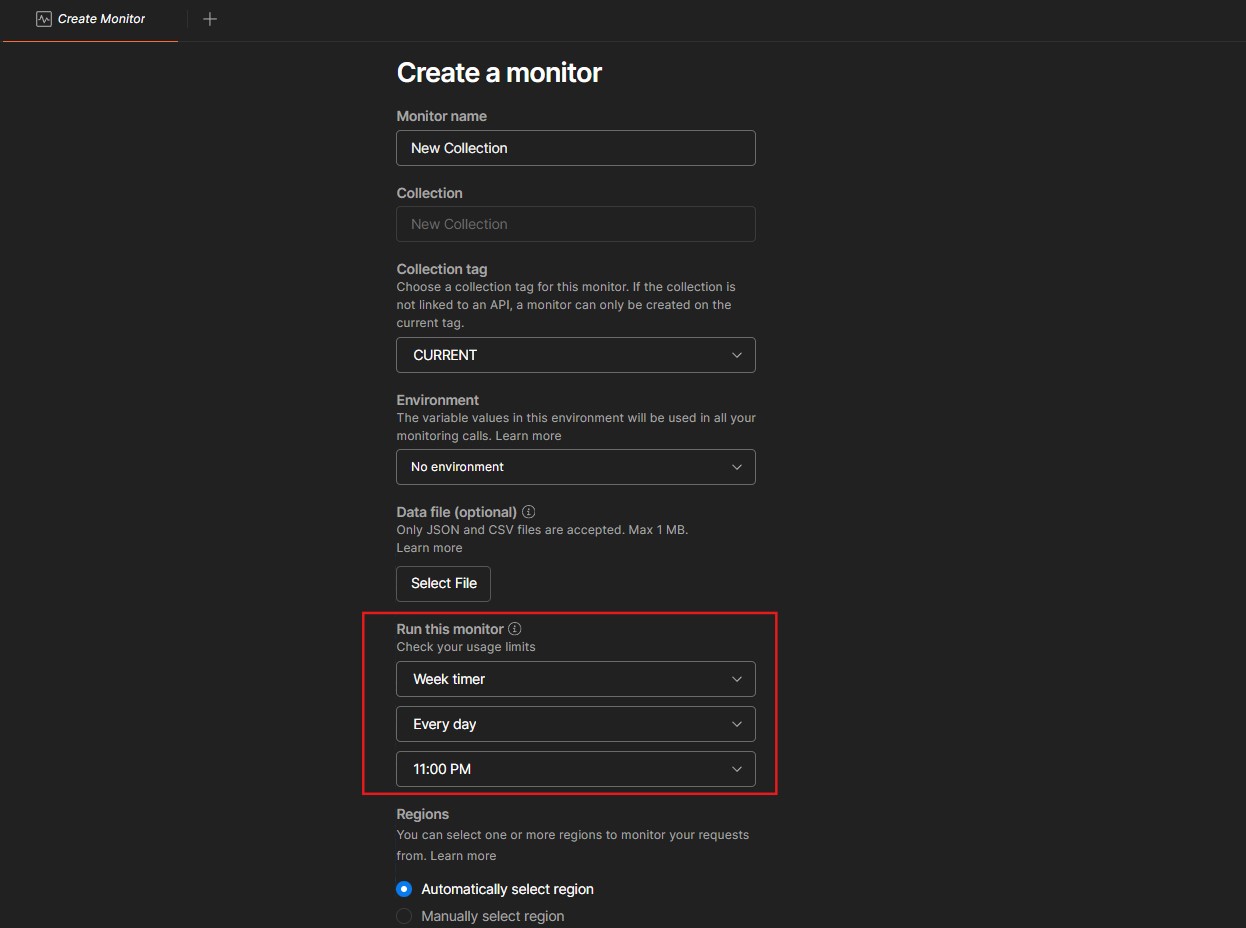
- Choose the time zone and start time.
- Set the frequency (e.g., every 30 minutes).
- Set Up Alerts:
- Configure email notifications for test failures.
- Review and Save:
- Review your settings and click on “Create Monitor”.
Writing Tests in Postman
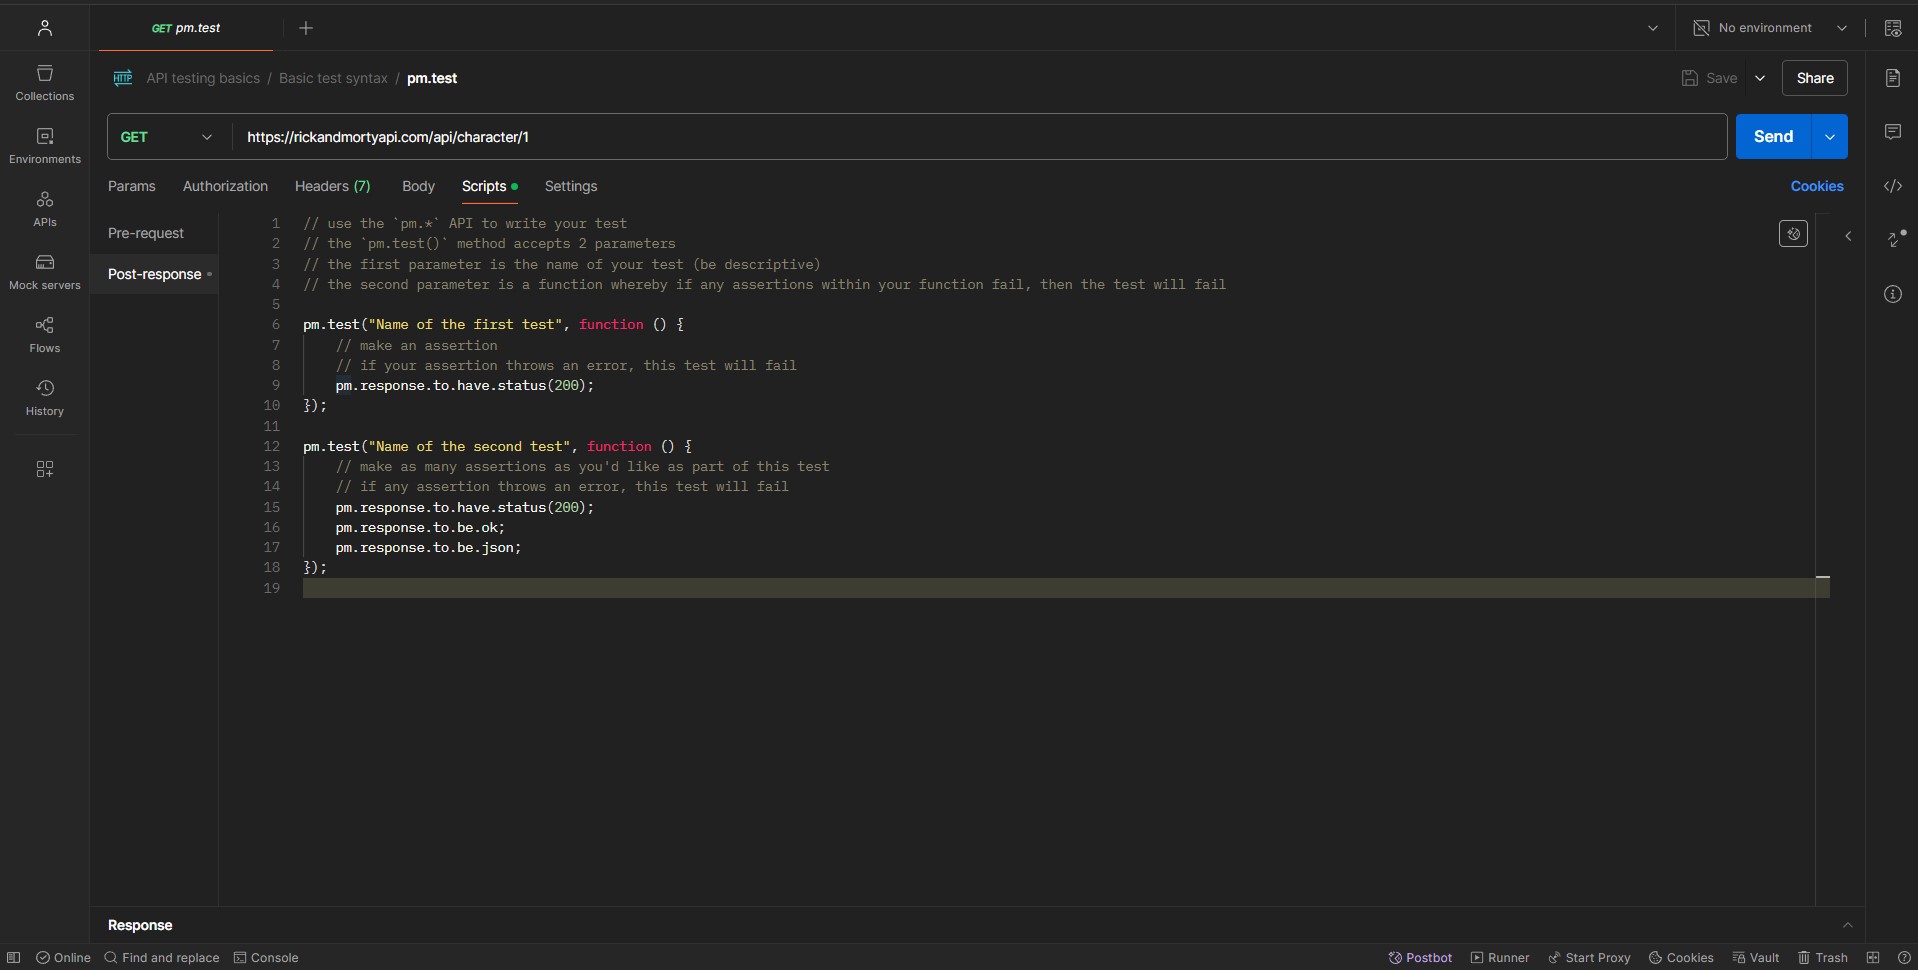
The “Scripts” Tab
Recently the “Tests” tab has been merged into the “Scripts” tab in Postman, and you can write tests in the “Post-response” part of the “Scripts” tab.
Best Practices for Writing Tests
By following some best practices, you can make your tests better and more understandable so that your tests become more robust and reliable. Let’s check out some of these best practices:
1. Descriptive and Clear Test Names
- Why It’s Important: Clear names make it easier to understand what each test checks at a glance, especially when reviewing test results or sharing tests with colleagues.
- Example: Instead of naming a test “Test 1” or “Status Check,” use descriptive names like “Verify Status Code is 200 for User Endpoint” or “Ensure Response Time is Below 500ms.”
2. Testing One Concern Per Test
-
Why It’s Important: Focusing on one assertion per test simplifies troubleshooting and understanding test results. If a test fails, you know just what went wrong.
-
Example: Separate them instead of combining status code and response time checks in one test:
// Test for status code
pm.test("Status code is 200", function () {
  pm.response.to.have.status(200);
});

// Test for response time
pm.test("Response time is less than 500ms", function () {
  pm.expect(pm.response.responseTime).to.be.below(500);
});
3. Use Assertive Language
- Why It’s Important: Assertive language in tests makes them more readable and intention-driven. It clarifies the purpose of the test.
- Example: Use assertive phrases like
expect(response).to.contain...orresponse.should.have..., clearly stating the test’s expectations.
4. Organize Tests Logically
- Why It’s Important: Grouping related tests or organizing them logically can make your testing suite more understandable and maintainable.
- Example: If testing various aspects of a user API, group tests related to user creation, user data retrieval, and user deletion together.
5. Handle Different Test Scenarios
-
Why It’s Important: Testing only the “happy path” can leave critical bugs in edge cases. It’s essential to test various scenarios, including potential error conditions.
-
Example: Alongside testing a successful API call, write tests for scenarios like invalid inputs, unauthorized access, or server errors.
// Test for invalid input
pm.test("Response for invalid input is 400", function () {
  pm.expect(pm.response.code).to.eql(400);
});
6. Maintainability and Reusability
- Why It’s Important: Tests should be easy to update and reusable for different scenarios. This practice saves time and effort in the long run.
- Example: Create reusable functions for common test assertions. Call these functions with different parameters as needed rather than writing the same code in multiple tests.
7. Commenting and Documentation
- Why It’s Important: Good comments and documentation make it easier for others (and your future self) to understand the purpose and mechanics of your tests.
- Example: Add comments to clarify complex logic or the reason behind specific test cases, especially when testing less obvious or intricate API parts.
Using pm.response in Postman for API Testing
pm.response is an important object in Postman scripting that gives you much information about the response returned from your API request. By using pm.response correctly and effectively, you can improve your API testing because this object allows you to access and validate various aspects of the response data. Here’s a more detailed look at utilizing pm.response in your tests:
Accessing Response Attributes
pm.response contains several properties and methods that give you access to different parts of the API response, such as the status code, response time, headers, and body. Here’s how you can use them:
-
Status Code: Access the status code of the response to verify if the API request was successful.
let statusCode = pm.response.code; pm.expect(statusCode).to.eql(200); -
Response Time: Check how long the API took to respond, which is crucial for performance testing.
let responseTime = pm.response.responseTime; pm.expect(responseTime).to.be.below(500); // time in milliseconds -
Headers: Examine the response headers for important metadata like content type, caching policies, and more.
let contentTypeHeader = pm.response.headers.get("Content-Type"); pm.expect(contentTypeHeader).to.include("application/json"); -
Body: The response body contains the data returned by the API. You can parse this data and make assertions based on your API’s expected output.
let responseBody = pm.response.json(); // For JSON response
pm.expect(responseBody).to.have.property("name", "John Doe");
Validation Examples
Validating Response Status Code
-
Validate single status code:
pm.test("the endpoint returns the expected status code", () => { // change 200 to the response code you expect const expectedStatusCode = 200; pm.response.to.have.status(expectedStatusCode); }); -
Validate multiple status codes:
// change 200 or 201 to the response code you expect
pm.test("Status code is 200 or 201", function () {
  pm.expect(pm.response.code).to.be.oneOf([200, 201]);
});
Validating Response Time
// change 500 to the expected response time
pm.test("Response time is less than 500ms", function () {
  pm.expect(pm.response.responseTime).to.be.below(500);
});
Validating Response Headers
pm.test("Content-Type is application/json", function () {
  pm.response.to.have.header("Content-Type", "application/json");
});
Validating Response Body
Postman test to check field value in response
We can validate the value of both id and name fields of the https://rickandmortyapi.com/api/character/1 using the test below.
pm.test("API response contains the expected fields", () => {
  const response = pm.response.json();

  // the line below checks value of the id field is 1 (number).
  pm.expect(response).to.have.property("id", 1);

  // the line below checks value of the name field is Rick Sanchez (string).
  pm.expect(response).to.have.property("name", "Rick Sanchez");
});
Test if Response Body matches schema
Testing if the response body matches a specific schema
pm.test("Body matches schema", function () {
  let schema = {
    type: "object",
    properties: {
      id: { type: "integer" },
      name: { type: "string" },
      status: { type: "string" },
      species: { type: "string" },
      type: { type: "string" },
      gender: { type: "string" },
      origin: {
        type: "object",
        properties: {
          name: { type: "string" },
          url: { type: "string" },
        },
        required: ["name", "url"], // Added required property for origin
      },
      location: {
        type: "object",
        properties: {
          name: { type: "string" },
          url: { type: "string" },
        },
        required: ["name", "url"], // Added required property for location
      },
      image: { type: "string" },
      episode: {
        type: "array",
        items: { type: "string" },
      },
      url: { type: "string" },
      created: { type: "string" },
    },
    required: [
      "id",
      "name",
      "status",
      "species",
      "type",
      "gender",
      "origin",
      "location",
      "image",
      "episode",
      "url",
      "created",
    ],
  };
  pm.expect(pm.response.json()).to.be.jsonSchema(schema);
});
Test if nested field value is available in response
The script below step works for fields at the root of the response. What if we wanted to test the name field under the origin field. We can tweak the script to support fields at any level.
pm.test("API response contains the expected fields", () => {
  const response = pm.response.json();

  // the line below checks value of the id field is 1 (number).
  pm.expect(response).to.have.nested.property("id", 1);

  // the line below checks value of the name field is Rick Sanchez (string).
  pm.expect(response).to.have.nested.property("name", "Rick Sanchez");

  // the line below checks value of the origin.name field is Earth (C-137) (string).
  pm.expect(response).to.have.nested.property("origin.name", "Earth (C-137)");
});
Check nested array value in response
We can take it further and use the same technique to validate the value of items in the array. For example, we can use the script below to check the value of the second item in the episode array of the https://rickandmortyapi.com/api/character/1 endpoint.
pm.test("API response contains the expected fields", () => {
  const response = pm.response.json();

  // the line below checks the value of the episode field at index 0 is "https://rickandmortyapi.com/api/episode/1".
  pm.expect(response).to.have.nested.property("episode.0", "https://rickandmortyapi.com/api/episode/1");
});
No code API testing using Testfully
Testfully is a leading API testing & monitoring tool and a great Postman alternative for API testing. The below video is a quick demo of Testfully and how you can use it to test your APIs without writing code.
Frequently Asked Questions
We got an answer for your questions
-
What is API testing?
API testing is a type of software testing that focuses on verifying that APIs function as expected. It involves sending requests to API endpoints and analyzing the responses to ensure they meet the expected outcomes, covering aspects like functionality, performance, and security.
-
Why is API testing important?
API testing is essential because it ensures that your APIs work correctly and meet the required standards. It helps catch issues early in the development process, improves quality assurance, enhances security, and ensures the performance and reliability of APIs.
-
How do you use Postman for API testing?
To use Postman for API testing, create and manage API requests, organize them into collections, use environment variables for different settings, write test scripts in the "Tests" tab, and automate the tests using Postman CLI or integrate them into CI/CD pipelines.
-
What are Postman Collections?
Postman Collections are groups of related API requests that you can save and organize together. Collections help manage and run tests efficiently, keeping your API testing organized and scalable.
-
How can I automate API tests with Postman?
You can automate API tests in Postman by writing test scripts in JavaScript, using the Postman Collection Runner to run collections, and integrating Postman CLI with CI/CD tools like Jenkins, GitLab CI, or CircleCI to run tests automatically with each build or deployment.
-
What is the Postman CLI?
The Postman CLI is a command-line tool that allows you to run Postman collections directly from the terminal. It's useful for integrating API tests into CI/CD pipelines and automating the testing process.
-
Can Postman be used for performance testing?
While Postman can be used for basic performance testing by measuring response times and simulating load with multiple iterations, it is not specifically designed for extensive performance testing. For more detailed performance testing, tools like Apache JMeter or Gatling are recommended.
-
What are Postman Monitors?
Postman Monitors are a feature that allows you to schedule and run API tests at regular intervals. Monitors help ensure your APIs are always functional and performant by providing continuous testing and alerts for any test failures.
-
How do environment variables work in Postman?
Environment variables in Postman allow you to define and manage variables for different environments, such as development, staging, and production. This makes it easier to switch settings without changing the actual requests, ensuring flexibility and efficiency in testing.
-
What are some best practices for API testing with Postman?
Best practices for API testing with Postman include organizing requests into collections, using environment variables, writing clear and reusable test scripts, automating tests, integrating with CI/CD pipelines, and regularly monitoring API performance using Postman Monitors.